Read a detailed repair manual for a windshield wiper on a car: what parts need to be checked and, if necessary, replaced, repair a gearmotor Read a detailed repair manual on a windshield wiper: what parts need to be checked and, if necessary, replaced, a gearmotor repair.

If the windshield wiper began to junk or even refused to work one fine day, then it should be repaired, which can be done without much difficulty by yourself. The essence of the repair of this mechanism mainly consists in straightening the levers or deformed rods of the cleaner, cleaning it from dirt, if it is impossible to fix it, we replace it with completely new parts. If the essence of the breakdown lies in the gear motor, then only the gears can be replaced in it or the contacts of the limit switch or collector can be cleaned. Otherwise, the gearmotor will have to be replaced with a new one or a working old one. We repaired the windshield wiper of a VAZ 2110 car, the process is identical on other car models.
Step-by-step procedure for repairing a wiper:
1. Remove the wiper from the vehicle.

2. The nut that holds the leash must be unscrewed.
3. Now remove the leash.

4. In order to remove the gearmotor from the bracket, you need to unscrew the 3 bolts that hold it.
5. The geared motor is wrapped in a thin leather film, it must be removed.

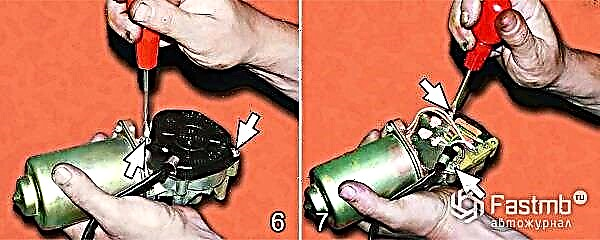
6. Then unscrew the 2 screws that secure the black plastic cover.
7. Remove the cover and remove the next two screws.

8. Now the plate with the three contacts of the limit switch located on it can be removed. 9. Next, remove the brown pad.

10. Remove the largest gear with a gear motor roller and then a plastic washer under it.
11. Next, you need to take out the two small gears, but before taking out, they should be marked. This is done in order not to confuse their location later. They have a different slope of the teeth.

12. To disconnect the gearbox from the electric motor, it is necessary to unscrew the two opposite screws.
13. Remove the armature from the metal casing of the electric motor.
14. Clean as much as possible all parts of the gearmotor from the formed dirt and old grease.

15. Press the three brushes into the brush holders with your fingers, they should move freely without any particular difficulties. If some of the brushes run hard in the brush holder, have cracks or other defects, then they must be replaced with new assembled ones. If you are changing parts for new ones, then do not forget to solder the leads to the brush holder later.
16. Next, we check three springs, they should not be stretched or, even worse, broken.

17. Examine the manifold for damage (scratches) or dirt. If necessary, walk (clean) it with a fine sandpaper. If the collector is very worn out and cleaning will not give the desired result, then only the armature or the entire gearmotor must be replaced. Also pay attention to the upper part of the anchor, if there are traces of jamming (stripes), then also go over with a fine sandpaper.
18. If the teeth of the gears of the reducer have gross defects (scratches), then they must be replaced.
19. It is also necessary to replace the complete rods if the threads of the brush arm rollers or splines are defective.
20. We return to the plate with the contacts of the limit switch and, if necessary, clean them with sandpaper.

21. We inspect the leash mount, or rather the black rubberized cushions, if they have lost their elasticity or burst, then replace them with new ones. Before removing the rubber band, first remove the inner steel spacer sleeve.
22. After what has been done, you can start reassembling the wiper, just before you start completing the parts, lubricate everything (the armature shaft worm and gears) with good grease Litol-24 and pay attention to the two small gears you marked earlier, install them in their places.

23. Next, to install the anchor, tie the brushes to the contacts with a thread or wire so that they are folded. This is done so as not to break them during assembly.
24. Now you can carefully mount the armature into the gearbox housing.

25. Holding the armature shaft, install the electric motor housing on the gearbox and then untie the rope or bite off and remove the wire that held the brushes. After assembling the gearmotor, tap it with a wooden hammer handle to center the bearings.
26. Now you can mount the leash back on the gearbox axle, only it must be in a horizontal position in proportion to the central link.
Good technical characteristics of the geared motor
The frequency of rotation of the motor gearbox shaft at a supply voltage of 14 V, a load torque of 1.47 N • m (0.15 kgf • m) and an ambient temperature of (25 ± 10) ° С, min–1
- first (small): 30-40
- second (large): 55–70
The current consumption at the above load should be no more than:
- at first speed - 3.5 A
- at the second speed - 5 A
WHA