Adjusting valves on a VAZ 2106 is a procedure that requires certain knowledge. The gap is set between the rocker arm and the camshaft eccentric.

The content of the article:
- Instruments
- Adjustment
- Why adjust the valves
- Conclusion
Adjusting the valves costs about 800-1000 rubles, and in current conditions this is a considerable amount, so it makes sense to do it yourself. Before starting work, you need to stock up on a small set of tools and spare parts.

Instruments:
- Key for 14, open-end;
- A set of socket wrenches, there is no point in listing them, because different cars may have different nuts, because the owners often do not pick exactly the same;
- Flat blade screwdriver;
- Valve cover gasket;
- Sealant, just in case;
- The stylus is 0.15 mm thick. It is advisable to use a special wide probe, because the typesetting is too narrow, the adjustment of the valves with it is not as accurate as required;
- Key 38, special, for crankshaft rotation. If there is a ratchet, then you can rotate it.
Adjustment of valves
First of all, on a carburetor car, we remove the carburetor and air filter, and on the injector only nozzles that will prevent you from removing the valve cover.
Then we unscrew all the nuts around the perimeter by 10 using a socket wrench, be sure to collect the washers in a container so as not to lose, since they are quite specific. Of course, you can later purchase them in the store, but this can significantly delay the work process.

Now we take a crooked starter or a key, then we rotate the crankshaft clockwise until the mark on the pulley coincides with the last low tide on the front cover. With this action, we set the pistons of the first and fourth cylinders to top dead center. It is at this very moment that the valves in these cylinders must be completely closed, respectively, it is in this position that the adjustment is carried out.
The VAZ 2106 engine works according to the 1-3-4-2 scheme. That is, when the pistons of the first and fourth cylinders are at top dead center, the pistons of the third and second are at the bottom.
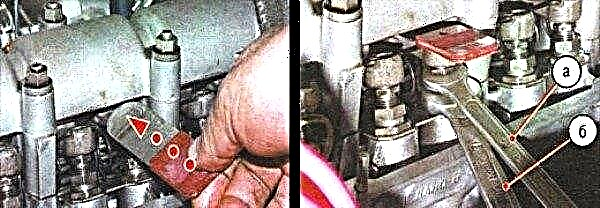
So, after we have set the pistons as needed, we proceed to adjust the valves. To determine those that we need, we can simply shake the rocker arm - a slight tapping will be heard. We need valves 8 and 6, we count from the front of the car.

To adjust, insert a dipstick between the camshaft cam and the rocker arm. If the dipstick enters with an interference fit and exits the same way, then nothing needs to be adjusted. If it passes easily, then you need to unscrew the lock nut and unscrew the adjusting bolt. At this time, while we twist, we fidget with the probe to catch the optimal position.
After it is determined, tighten the lock nut. It is very important to ensure that the adjusting screw does not turn a degree. In any case, you need to check. To do this, fidget with the probe again. If this is not possible, or vice versa, the probe moves without effort, repeat the procedure.
At this point, if you look at the camshaft gear, the mark on it coincides with the ebb on the camshaft housing. So, this is the best guideline, because the crankshaft will need to be cranked exactly 180 degrees, the camshaft will rotate 90 degrees. We adjust the 4 and 7 valves. Next, we turn the crankshaft again and adjust the valves in accordance with the table.
There is no point in discussing the assembly. The only thing worth paying attention to is the plane of the valve cover plate. Over time, it is pushed through with washers, so dressing is required. If grooves are visible in the tightening points, then it must be corrected on the anvil.
Why do you need valve adjustment
Many car owners think that valve adjustments are required to reduce engine noise. In fact, everything is much more complicated.
Every part in a powertrain has a coefficient of expansion when it heats up. That is, when it heats up to operating temperature, the dimensions will increase slightly. This happens even with the smallest parts of the motor. That is why the clearance in the valve drive is called thermal. So, imagine that the gap is not large enough, and after heating, the camshaft will constantly keep the valve open. This is called “clamped”. From here we get a lot of troubles and headaches:
- Loss of compression in the cylinder, as a result - difficult engine start, insufficient power, increased fuel consumption, insufficient combustion temperature and much more;
- A permanently open valve is its inevitable combustion. At first it will be carbon deposits, then it will turn into a permanently red-hot precipitate, which will ignite the working mixture when it pleases. It will all end with expensive repairs. In addition, if the engine is injector, there is a risk of destroying the injector, and not only it, because hot gases will escape into the intake manifold. Naturally, if the inlet valve is clamped. There will be shots to the carburetor and to the air filter, if the first one is installed.
If the valve is free, that is, the gap is too large, then this will lead to incomplete opening of the valve, respectively, to a drop in power, there will also be an overconsumption of fuel, because more fuel will have to be added.
Conclusion
Adjusting the valves on the VAZ 2106 is much easier than on cars where adjusting plates are installed, so the whole procedure, with smoke breaks, will take no more than 2-3 hours.
WHA