The content of the article:
- What is a branch pipe
- Damage symptoms
- Composite cooling systems
- Damage consequences
- Nozzle replacement process
- Repair cost
Sooner or later, regardless of a new car or a used cooling system, it will need to be repaired. Most often, this starts with the system connections. Failure of such connectors can lead to irreversible damage. Late inspection will lead to a lengthy repair process.
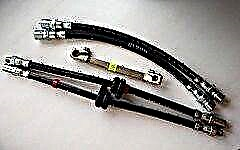
Cooling system branch pipe

What is a branch pipe, there are often several of them in the cooling system, they connect individual parts into one sleeve and are the basis for cooling.
The branch pipes can be divided into two types:
- diverting;
- leading.
From the names it becomes clear that the outlet pipe is designed to drain the coolant, and the inlet pipe for its supply. Antifreeze or antifreeze is most often used to cool the engine, since at very low temperatures they tend not to freeze.
It is worth recalling that you should not confuse or interchange two different types of pipes, since their operating temperature conditions are different.
Most often, the supply pipe fails, since the load on it is maximum, which leads to the drying of the rubber, as a result it can leak or even burst.
Signs of a breakdown of the cooling system pipe

The first and most frequent sign of a breakdown in the cooling system under the hood or under the car can be found wet and slightly greasy coolant stains. These are the first signs that a branch pipe has burst somewhere. Also in the cabin, on the dashboard, there is a special indicator that will show a low level of liquid in the expansion tank.
If the sensor fails, the engine temperature will rise rapidly, as a result of which the engine may boil. It also happens that the smell of antifreeze can be felt in the cabin, this is an indicator that the pipe may burst not under the hood, but under the front panel or in the area of the passenger compartment and engine partition.
Many experienced car enthusiasts advise, from time to time, just to check the level of antifreeze in the expansion tank. Inspect the pipes for greasy, oily stains and do not postpone repairs if found.

How to find a coolant leak in the system. First of all, it is worth inspecting the expansion tank for a leak. Next, we turn to the radiator, since it is most often damaged. During the inspection, special attention should be paid to the joints of pipes (nozzles) and honeycombs, which are easily damaged.
Next, we inspect the pipes and hoses themselves along their entire length, since it is through them that the coolant circulates. Do not forget about the clamps at the joints, due to engine vibration, the clamps may loosen, which means that the branch pipe can come off the attachment point and leak. The last and most unpleasant breakdown of the cooling system is the ingress of liquid into the oil jacket. As a result, by checking the oil level with a dipstick or opening the oil filler cap, you can see how it foamed. This is the first sign that coolant has entered the oil.
Engine cooling system

To say that the system consists only of some elements and nothing more is impossible, modern cars are crammed with a lot of sensors and control is carried out by an on-board computer. But still, there are basic components, without which the system simply will not exist.
These components include:
- radiator;
- water pump;
- thermostat;
- steam outlet hoses of the thermostat;
- steam outlet radiator hoses;
- expansion tank;
- radiator supply hoses;
- radiator electric ventilator.
Such parts can be found both in the most modern cars and in the oldest domestic ones. Therefore, when starting the search for damage, it is worth inspecting these elements first.
What does damage lead to?

The most common reason is overheating of the engine; failure will occur in a very short period of time. As a result of overheating, the cylinder block deforms, cracks may appear and the piston may deform.
But it is much worse when the piston is completely deformed and makes a hole in the cylinder block. Such a breakdown usually leads to a complete replacement of the damaged engine with a new unit.
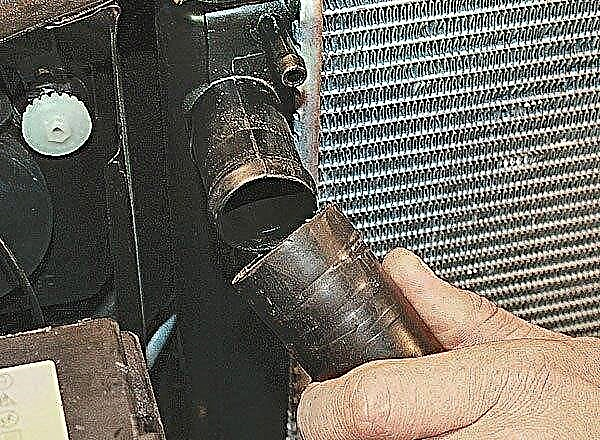
Nozzle replacement process

The first thing to do before starting to replace the pipe is to completely drain the coolant from the system. If the liquid is clean, drained into a clean container, then it can be reused. Now it is worth removing the clamps on the missing pipe. It happens that they rust, so you should prepare all the necessary tools and WD40 in advance to facilitate the removal process.
It is worth remembering that all procedures must be carried out on a cooled engine, especially draining the coolant, otherwise you can be injured.
A similar, new branch pipe must already be prepared in advance. The old pipe should be removed slowly and without strong efforts, since the radiator necks are not strong enough and easily break. If it cannot be removed, it is recommended to scroll from side to side, but not bend in any way.
In extreme cases, you can cut it to length, so you can remove the old pipe. Removing is often not a problem, but putting on a new one is much more interesting. If the new pipe does not lend itself to the procedure, then its inside should be lubricated with a solution of soapy water. But in order to soften it, you need to lower the desired part in hot water.
In no case, you should not use oil and camping materials, since the pipe can corrode over time, and oil can also get into the cooling system.
The last step is to put on the clamps on the branch pipe, and only then we put it on the radiator necks and the water jacket. Make sure that the branch pipe is correctly positioned, not twisted. Now we tighten the clamps at the necks, and we begin to fill in the coolant.

After filling, once again make sure that there is no leakage in the places of replacement and repair. It is worth remembering that when draining, part of the coolant may be in the radiator of the stove. Now we start the engine and check the health of the system. After pouring a new one, you need to turn on the stove, then add liquid to the expansion tank.
If you manage to break one of the necks, then you should immediately solder it using argon welding.
Repair and parts cost
Much of the price will depend on the make and model of your vehicle. The more expensive it is, the more expensive the parts for repair will be. The average cost of a branch pipe for a VAZ car will cost from $ 5 to $ 10. But the better the manufacturer is, the more expensive the parts are.
As for the repair procedure, you will have to pay from 600 rubles for the work. But in some service centers or stations, the start can start from 1000 rubles.