The content of the article:
- General information about polishing
- Headlight preparation
- Application of polishing paste
- The final stage
- We polish the headlights with toothpaste
Good "vision" of the car, which is determined by the quality of its headlights, is, in fact, the vision of the driver himself in the dark, as well as one of the conditions for his safety. Therefore, if car headlights become dim, which often happens in a car with significant mileage, this becomes a serious problem for the car owner.
Headlights can be dimmed as a result of prolonged exposure to climatic conditions, as well as from constant contact with road dust and other debris. Clouded optics look far from brilliant, but besides this, it still loses its ability to transmit light normally.
What to do in this case - to throw out the clouded headlight and spend money on purchasing a new one? Do not rush to make such a decision - it turns out that a dull headlamp can be polished and thus return to it not only the external shine, but also the main optical properties.
General information on polishing optics

Headlight polishing is an algorithm of fairly simple actions, reminiscent of car body polishing. This process returns the headlamp to its previous presentation, especially after a minor accident, eliminating scratches and yellow plaque.
Should I buy new glass?
Indeed, if you do not think too much, this problem may seem easy, not worth a damn - I bought another optics for the headlight, and you should not waste time polishing. But you try to find a separate glass in car dealerships - it will not be easy to do, because the sellers will mostly offer you to buy the whole headlight.
A fully assembled headlamp is much more expensive. Then you will think about it: is it not better to revive the old headlight by polishing the damaged optics? Better. Because it is cheaper, and therefore more profitable.
Varieties of headlights optics by material
The headlights can be divided into polycarbonate (plastic) and glass ones according to the material used for the optics. We must say right away that polishing glass headlights requires professional experience and special technology that cannot be applied at home.
If these conditions are not met and the glass optics are polished using a handicraft method, then the result can be a low-quality beam consumption, which will make the lamp illuminate the road half as bad. Therefore, leave the glass optics polished to specialists or replace it.
But it should be noted that the overwhelming majority of modern cars are equipped with plastic headlights, which will not be difficult to polish with your own hands.
Causes of clouded optics
There are several reasons why the performance of a headlamp may be poor. First of all, it is worth remembering about ultraviolet radiation and road dust, which literally bites into the plastic surface of the headlight when the car is moving quickly.
Oncoming road debris, such as sand or rubble, can leave serious scratches on the optics, which will also interfere with lighting. In addition, the headlight can become cloudy and yellow as a result of poor-quality tuning associated with a change in the color of the headlight.
Preparing optics before polishing

Before polishing it is necessary to thoroughly wash the optical surface of the headlamp and dry it no less thoroughly. After that, take paper or masking tape and carefully cover the surrounding parts with paintwork (paintwork): radiator grilles, bumper, fender edges, etc. It is best to cover all these parts with tape in several layers - there will be more guarantee that you do not damage the body with a polishing machine and abrasive paste.
Take this procedure responsibly - it is of great importance. The abrasive paste, which is used for polishing, is quite aggressive in its chemical properties - it can "eat" the outer layers of chromium and paint right down to the ground. And if this happens, then you will have to paint the damaged areas, which will take both time and money.
Choosing sandpaper
If the optics have damage in the form of scratches and chips, you can get rid of them using sandpaper. The choice of paper grain size will depend on how deep the damage is.
For deep enough scratches, choose sandpaper with a grit size of P600-1000. For secondary processing, use a finer grit P2000 sandpaper.
During the processing of the headlights, the optical surface should be regularly moistened with water. On average, each type of sandpaper takes about 2-3 minutes to work. After grinding, the surface of the optics should be uniformly matt. Next, we proceed directly to polishing.
Application of polishing paste for optics

So, let's start polishing the headlight with our own hands. We treat the scattering surface of the headlight with a special abrasive paste with different cutting properties. Experienced car enthusiasts recommend using Meguiars brand 83-85 polish.
Processing with such a paste returns the lost shine to the plastic, and the scratches disappear as if they had never existed. In addition, this paste is no less successful in eliminating microcracks resulting from a collision with road debris.
Prepare your polishing machine before you start polishing. Install a special polishing pad on it. At the same time, do not forget that later it will be possible to process paintwork with the same nozzle, only, of course, with another type of polish.
Next, you need to set the lowest RPM mode - about 1200 rpm. Keep in mind that the higher the RPM, the greater the risk of damaging the optics surface during the polishing process.
So, turn on the machine and start polishing. Hold the car so that the attachment is parallel to the surface of the headlight. If you hold the nozzle at an angle, the processing will be uneven - this can lead to the fact that in one place the headlight will remain cloudy and yellow, and in other places it will become too glossy.
The final stage of optics polishing

If you do everything correctly, then after working with a grinder, there will be no stains from the polishing paste on the surface of the headlight, and this means that it is time to move on to the final phase. We remove micro-residues of the abrasive composition. Use a soft velvet rag for this.
That's probably all. But at the same time I would like to add that it is possible to restore the optical surface of the headlights not only with the use of polish, but also with the help of other means. For example ... toothpaste!
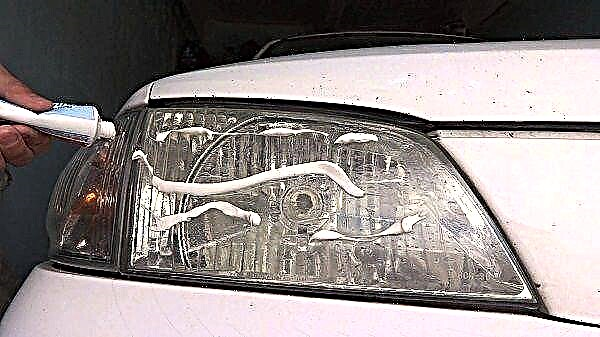
We polish the headlights with toothpaste

Toothpaste has abrasive properties, so you can save some money by replacing expensive polish with regular toothpaste.
To polish the headlights in this way, you need to perform the following list of works:
- Clean the surface of the headlamp with water and detergent. After that, the optics must be degreased with gasoline or alcohol. Then rinse with water and dry thoroughly.
- Apply a layer of toothpaste to a clean cloth.
- Using gentle circular motions, work the headlamp. Then rinse off the paste and repeat all over again as many times until the desired result appears. As a rule, 5-10 times of headlight processing is enough for the desired result.
- After the last treatment, rinse the plastic with clean water to rinse off all the paste, then wipe with a fresh cloth and pat dry.
- Finally, you can take a body polish, apply a thin layer to the headlight and then wipe it with a clean cloth to a mirror finish.
That's all! After the described procedures, your headlights will become like new, saving you from having to visit a car dealership once again. Good luck and a safe road!